
Laser Cut Inlays
My laser engraver is simply another tool in my shop. It is especially good at creating intricate inlays if you know a bit of how the laser cuts (vector operations) and engraves (raster operations). I will start with some explanations of the different types of graphics then some laser theory and then show an example inlay I created in CorelDraw. I actually created this inlay for something I made my son but unfortunately I didn’t get a lot of pictures of the final product due to time constraints but there are plenty of examples here on Todds Workshop for you to see other inlays I’ve done.
First lets talk about types of graphics and how the laser handles them. The simple distinction between vector graphics and raster graphics is, vectors are lines created by a mathematical equation and rasters are images made up of pixels. Vectors can be scaled infinitely with no distortion (the equation is just re-evaluated with bigger numbers), raster images cannot be infinitely scaled larger because there is no mechanism to make the pixels bigger, the image just gets blurry. I create all my inlays as vector graphics in CorelDraw in order to scale them up or down as needed to fit on the surface I’m inlaying. Even though I use vector graphics solely to create the artwork for the inlays the actual operations done by the laser will be a mix of vector cutting and raster engraving. A vector graphic can be raster engraved but a raster graphic cannot be vector cut. Let me explain… When cutting on the laser engraver the lines I talked about earlier have a line weight or thickness, typically expressed in points (pt), for example 1pt, 10pt, 216pt and so on. In order for the laser engraver to understand that you want it to perform a cutting operation you have to set the line weight to hairline. That is the smallest line thickness you can set. Anything above hairline and the laser can’t cut the line, it has to raster engrave it to the thickness you set for it. Think about it this way, the laser is focused on a single point and can follow a hairline around but anything thicker than that and it doesn’t know where on the line to follow because it’s thicker than a single point. Raster graphics have no lines and therefore none can be set to hairline so the laser engraver will only raster engrave graphics made up of pixels.
In it’s simplest form the beam from a CO2 laser, like mine, is just light, outside of the spectrum of visible light, produced by exciting carbon dioxide atoms. Make no mistake, the focused beam is invisible but extremely dangerous, hot enough to vaporize wood. I’m not going to discuss proper laser safety or laser theory here, I’m just here to explain what it’s doing as I see it and my process. I use the laser to both vector cut the inlay and raster engrave the void that the inlay is going to be placed in. I like to make the inlays somewhere between an 1/8″ and 3/16″ thick. This gives me plenty of glue surface and it’s thick enough to sand flat. It’s pretty easy to cut that thick of a material but the engraving sometimes doesn’t get quite that deep. When cutting with the laser you can set the frequency that the laser will fire. The laser isn’t firing during the entire vector or raster operation. It would burn itself up, I imagine, if it were. Instead it pulses on and off at a frequency. For cutting wood I find it better to set a lower frequency which makes the pulses longer. This is good for wood but for acrylic a higher frequency produces better results and clear edges. It just depends on the material you are cutting.
When it comes to engraving the voids the laser acts much like your printer does. In fact when I send a job to the laser it’s through a printer driver, just like your inkjet printer. The laser engraves at a resolution, from 75 to 1200 dpi or dots per inch. With a printer the higher the resolution, the more dpi, typically the better resolution the image is printed at and possibly the larger it is. That isn’t so with the laser. The higher dpi you set for the laser doesn’t necessarily give you a better engraving. It works somewhat like a printer but the big difference is on higher resolutions there are more pulses per inch but the dots are overlapped, not crammed in side by side. This equates to more pulses per inch, yes, but it also produces a lot more concentrated heat during the process. The image isn’t any crisper or clearer it’s just burned deeper. Hey wait a minute Todd, didn’t you say earlier that you couldn’t always get the depths you want when engraving the voids so why not engrave the voids at 1200dpi? That’s a good question and the simple answer is the voids actually become charred and burned after engraving them two or three times to get the depth I need, which doesn’t make for a good glue bond. Using a lower resolution in my case is best because I can achieve the same depth but with the wood being vaporized and removed instead of being charred. I typically engrave the voids at 400-600dpi. This is a nice happy medium for my laser engraver.
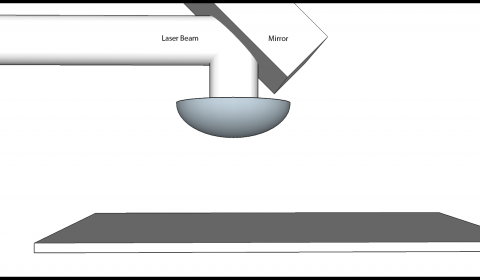
I have created some diagrams in Google Sketchup to aid in the explanation of my reasoning and how I accomplish good tight inlays on the laser. The beam on the laser is transported to the material via mirrors and a lens which focuses the beam (Figure 1). The beam when produced, before focusing, is about the diameter of a pencil. The energy in the beam is spread across this entire diameter which isn’t as hot as a focused beam, it is hot enough to do some major damage to you however. Once the beam is focused through the lens though it is hot enough to vaporize wood but here is where my processes start. The beam, before focusing, is cylindrical in shape (Figure 2).
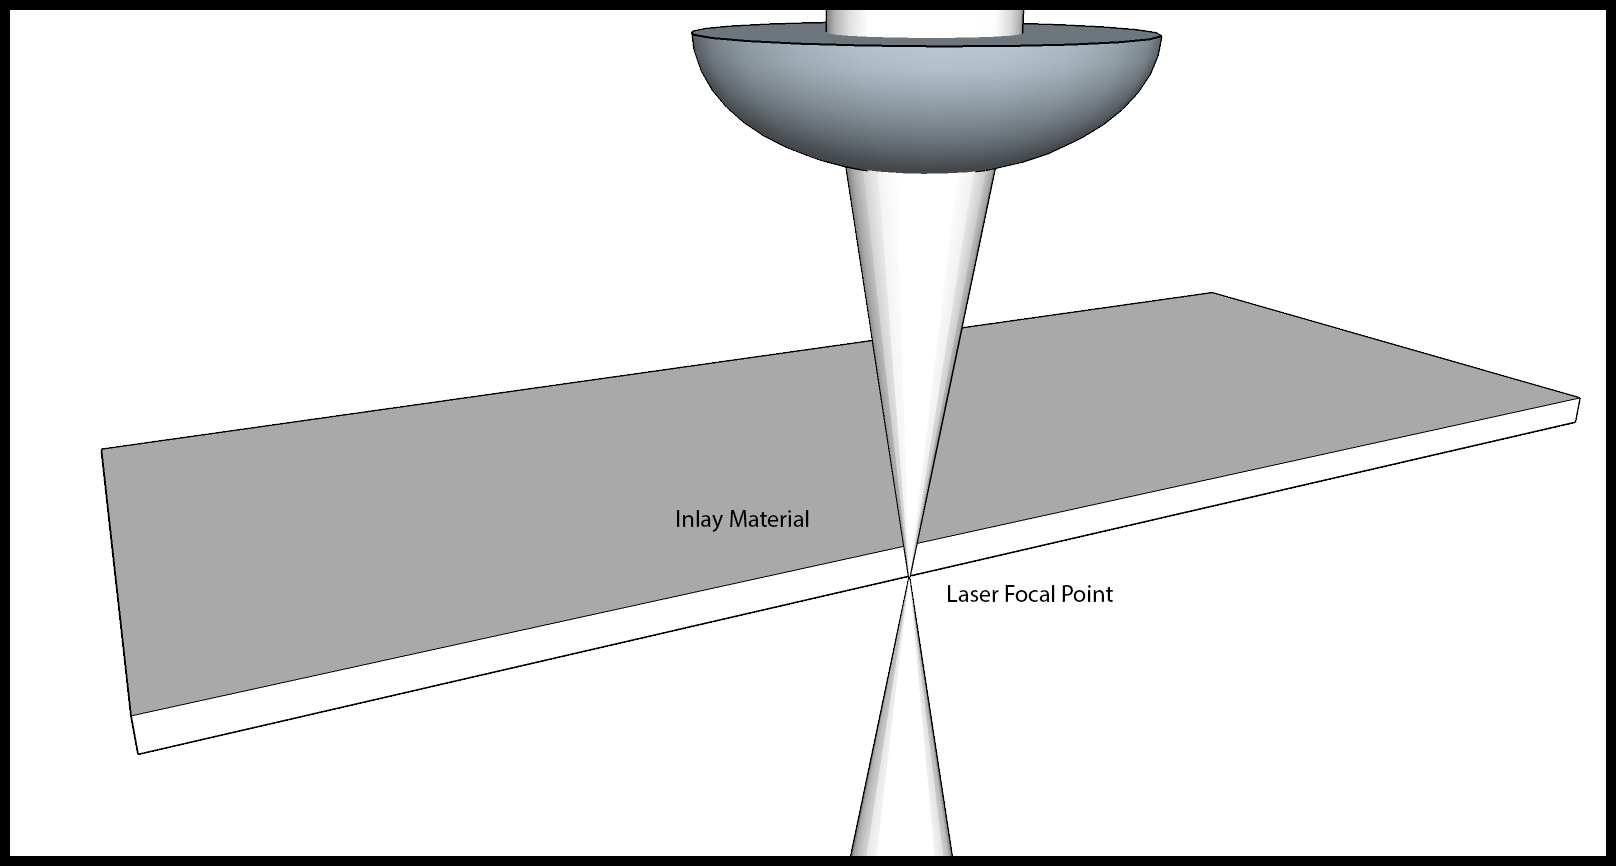
Once the beam passes through the lens it’s shape is changed to more of a conical shape. The laser when cutting out the inlay acts like any of the saws you have in your shop, it leaves a kerf. The difference though is the kerf from the laser doens’t have parallel sides like you get from your saws. It leaves a wedge shaped kerf due to the conical nature of the focused beam. Don’t get me wrong, the kerf isn’t a 60 degree triangle but you will see later that it does create some issues with the inlay. Also in Figure 2 you can see the focal point of the beam. Of course the beam doesn’t stop at the point where it’s focused. The light is bent through the lens but continues in straight lines after leaving the lens. For the vector cutting operation I like to focus the laser, not exactly at the bottom of the piece as it depicts in the illustration, but more along in the middle but for illustration purposes I show it at the bottom. This has yielded me the best results so far.
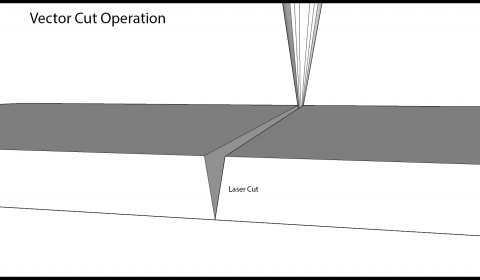
As you can see in Figure 3 the laser kerf is something that has to be dealt with. The illustration shows that more material is being removed from the top of the kerf than the bottom.
If the kerf had parallel sides, like you get from a spiral router bit, compensating for it would be as easy as scaling up the inlay to fill the size of the kerf but here it’s not that easy.
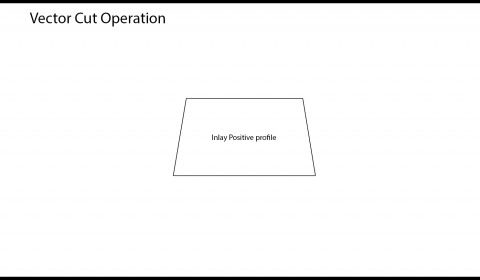
I’m going to make a very simple example inlay here. You can see that once the laser is done cutting the inlay the sides of it angle towards the center and makes a trapezoidal shaped profile as in Figure 4. Unfortunately angular kerf is present on both sides of the material.
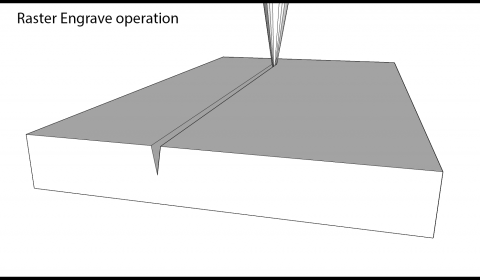
Lets step away from the vector operation for a moment and look at the raster operation. The laser doesn’t cut completely through the material in this operation as in Figure 5. Instead it creates a void buy making several back and forth passed overlapping the last by whatever resolution is set, Figure 5. You see though that the same wedge shape is present here also.
There is one difference though, the walls angle away from the center this time, opposite the vector cut, Figure 6. It does have a similar trapezoidal shape though. Now the kerf that had to be somehow adjusted for before is actually doubled. In all actuality to compensate for the angled walls cut in the void you would have to shrink the inlay to fit to the bottom of the void which would exacerbate the problem with the kerf even more. When doing test inlays I was getting very noticeable lines around all the pieces of the inlay, this is understandable considering I was shrinking the largest width of the inlay profile to fit the void.
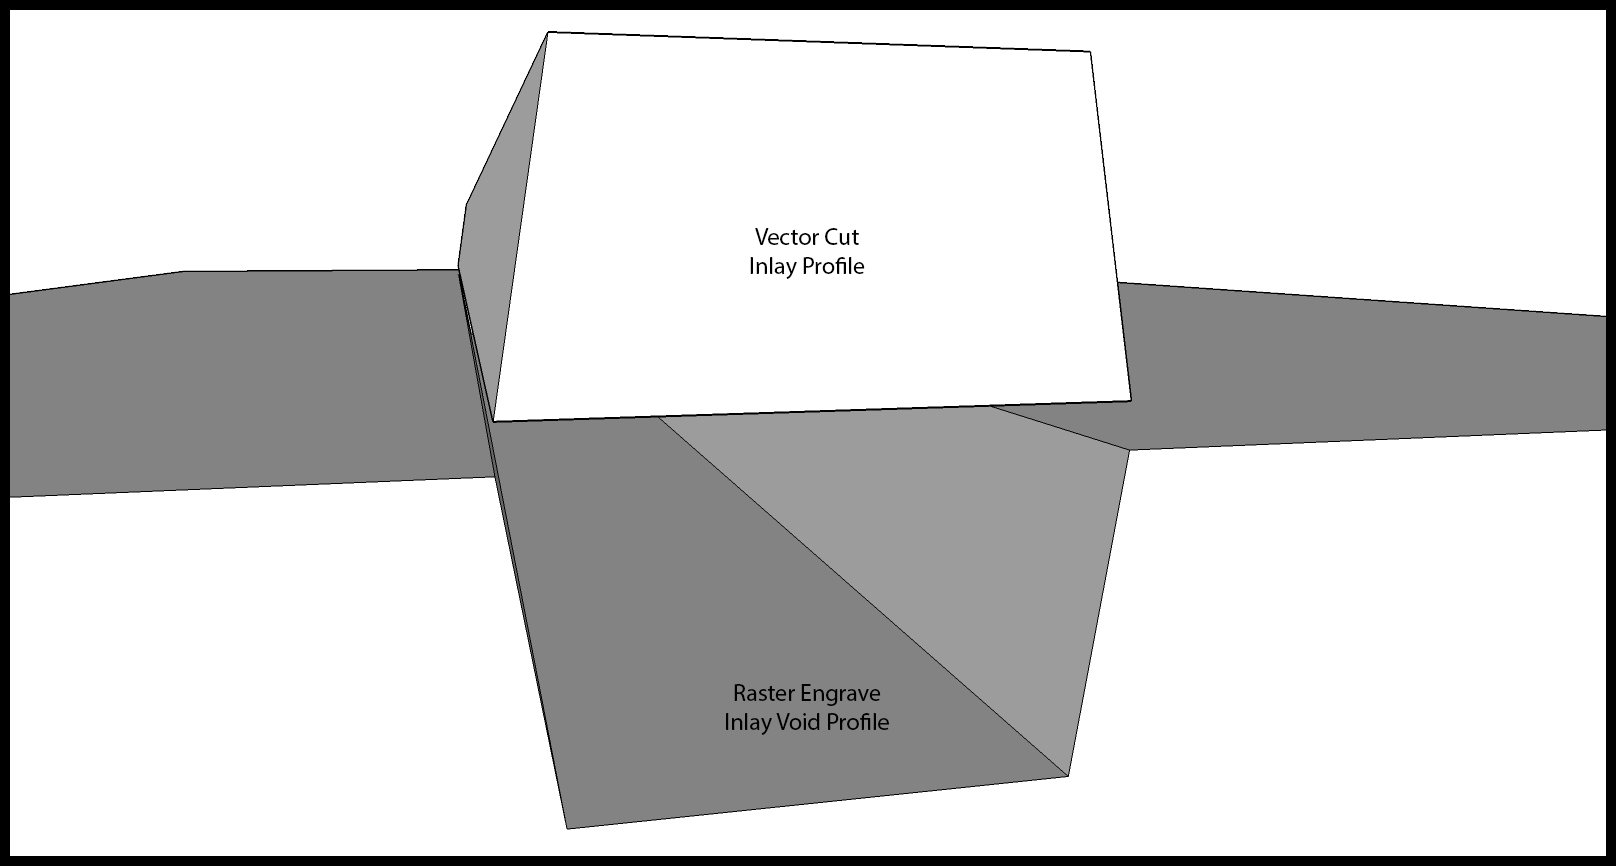
This is a fairly marginal amount, maybe 5 thousands of an inch but coupled with the opposite angles of the void it was much more pronounced.
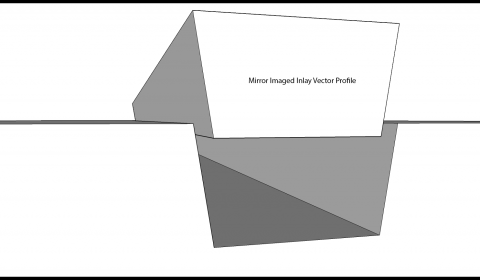
Here’s my secret if it isn’t evident yet by the illustrations, I mirror the inlay before cutting it out. This way when flipped over, Figure 7 to fit in the void the angles are now parallel and fit very nicely together. I still like to shrink the inlay by a few thousands of an inch to allow for glue and to make it seat all the way to the bottom of the void.
Some other things I do to prepare the files for lasering, if that’s even a word, are to make only black and white images. The laser handles colors and shades of greys differently than straight black and white. The easiest way I can explain it is white tells the laser not to fire and black tells the laser to fire at 100% of the power set in the print driver. Colors and shades of grey are interpreted as differing levels of power and the raster engravings would come out without flat bottom voids. The example inlay below is a before and after. I always color hairline vectors a in red so I know that’s whats being cut. I did raster engrave it with just pure black but I included the color to illustrate what the final product looked like. I think I used walnut, padauk and I can’t remember the third species for the woods in this. I think I have a picture of the inlay so I’ll try and find that and post it here.


You must log in to post a comment.