
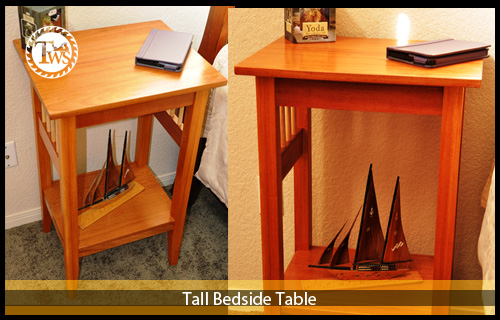
Tall Bed Side Table
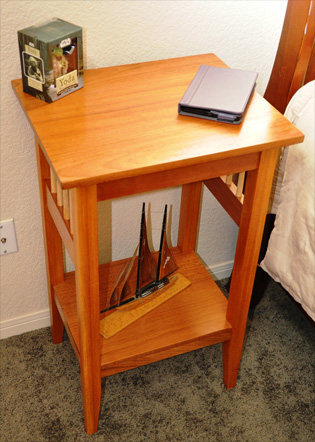 Figure 1I had all this Jatoba and Mahogany that was prepped and ready to go for that project but no cradle to make. I had two challenges to solve here. First I can’t waste all this wood, it has to be put to good use somewhere. Second my wife was charging her phone on an old shelf turned on it’s end on her side of the bed. Definitely not an ideal location for her to set her phone overnight. I decided to make her a new bedside table with the lumber I had sitting in my shop. Challenges overcome.
Going into this build I didn’t have a plan to work from and didn’t create one either. It was built using the “relative dimension” methodology. The table top and the shelf were cut already to size for the ends of the cradle so I just used those dimensions to base all other measurements from. The top is approximately 18″ x 15″. I started by gluing up some of the Mahogany for the legs and ripping them to about an inch and a half square. I wanted a slight reveal for the legs so I decided to set the aprons a quarter of an inch back from the leading edge of all the legs. Having the width of the legs and the distance that the legs would be proud I had all I the information I needed to find out the final dimensions for the aprons. I decided that an inch and a half was a good aesthetic distance for the legs (Figure 2) to sit from the edge of the table. I used a square and a pencil to draw on the underside of the top where the legs and aprons would relatively be. Even though I came up with some definitive size for the aprons from the full scale drawing this was still just a relative dimension. As long as the opposite sides were cut to the same length they needn’t be precisely measured. In this case close enough is good enough.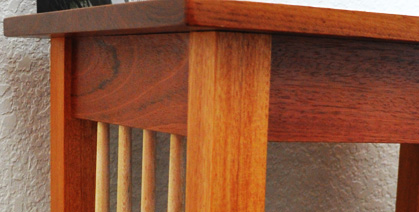 Figure 2
Now because this was all relative I don’t have any of the exact measurements for this build. When it comes to the sizes of the individual parts I’m going to be talking in generalities that are dripping with vagueness sprinkled with a little misdirection, hey whats that over there… and for good reason too, I didn’t record any of the measurements for this project. I just started construction. I don’t plan on building another, although my wife says…ahem…” you should build one to match for your side of the bed”. Not in the near future. I guess if that happens I’ll just have to buy more Jatoba and Mahogany…what a hardship. Always have to buy extra though. You never know when you will need an another 15 board feet of exotic hardwoods. Of course…I’d never be able to put that to good use.
I digress…I used the underside of the top to lay out where the aprons would, relatively, be. With a full scale drawing directly on the underside of the top I took the measurement from between where the legs would be and set a stop on my miter gauge to cut out the aprons. Figure 3 What I didn’t do was have the stock for the lower rails, that hold the spindles, or the lower shelf supports ready to go when I cut the aprons. Oh well, lessons learned. This wasn’t an issued though because when I did get them ready to go I just used the aprons to set the lengths of rails. Again, not a critically precise measurement. The lower rails may have been a few thousands off from the size of the aprons but not a big deal. The domino’s I used are forgiving enough for that and besides given enough clamping pressure any misalignment can be taken out by brute force…right? Fortunately there wasn’t any disparity between the aprons, lower rails or shelf supports and everything was all rainbows and unicorns at this point.
I finally had everything cut to size. I laid out, what to me, seemed like a pleasing taper on the bottoms of the legs (Figure 3) and cut them out on the bandsaw. I smoothed out the bandsaw inconsistencies with a block plane, because it’s always the tools fault and never mine that the cut wasn’t perfect. Now was the part I dreaded the most, the tapered spindles. The spindles started out around 12 or 13 inches long for the sides of the crib but that was too long for this project. 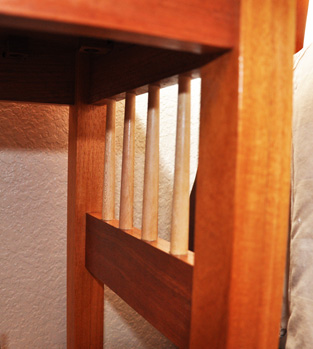 Figure 4Armed with my trusty, barely functional, cheaper than dirt, digital calipers I set out to cut the spindles to a consistent length with the ends as close to the same diameters as I could muster. My goal was to have the smaller side of the taper’s diameter be around 3/8″ and the other end would be whatever drill bit I could find that was close when I cut them to length. They were a little over 1/2 an inch diameter when all was said and done. I could live with that but the 1/2 inch drill bit was just that much too small. You know how much I’m talking about, just enough ta not fit. I rummaged around inside my drill bit drawer and finally found a bit that wasn’t too small, wasn’t too big but just about right.
I used the center finding ruler I made on my laser engraver to find the middle of the top edge of the lower stile and the underside of the short aprons. Whoa, that was a mouthful. Using a pair of dividers I stepped off 4 equidistant lines for the center of the spindles (Figure 4), used an awl to mark the intersections and went off to the drill press. 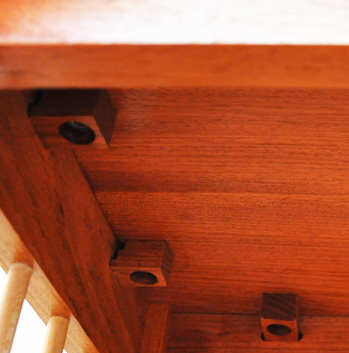 Figure 5This was the part I dreaded about the spindles, drilling the holes. I’m a minor perfectionist, some say that’s a little under exaggerated, so I was very careful when I set up the fence. Clamping it down to the drill press table you could almost hear it grunting as it was under so much pressure I almost made diamonds with it. Can’t have it moving on me now. I lined up where each hole was to be drilled one by one and clamped the board to the fence the same way. I didn’t want anything slip sliding away… All of my retentive measures paid off, none of the holes were out of place. You can’t imagine how relieved I was now. It was all smooth sailing from here…yeah right. Back at the workbench I started laying out domino locations. My reference for the dominos were the tapers on the bottoms of the legs. I gathered all four of the legs together, positioned the tapers as they would be when the table was assembled and marked all of the outside reference faces. This extra step was a life saver when I set out cutting mortised with the domino machine. I made sure to mark all the faces of the aprons, rails and shelf supports also. I started by cutting the domino mortises in the aprons, rails and supports because I could just center the domino’s along the thickness of the board. When it cam to cutting the mortises on the legs I wanted to inset the aprons and rails.
 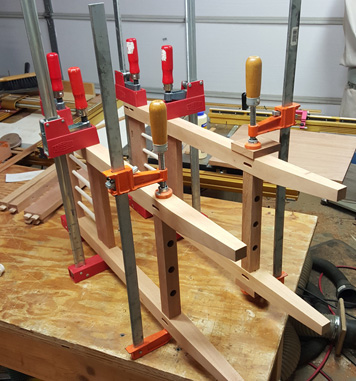 Figure 6The distance was already set for the aprons and rails so all I had to do was just increase the distance by however far they were to be offset. Too easy. Worked like a charm, till I realized I missed the 2 mortises on an end of one of the apron pieces. No worries, I’ll just cut them now. Clamped everything down, made the first cut but it didn’t sound like the others. Shrugged and made the second cut, flipped over the board to admire my handy work and realized the domino cutter didn’t alert me of the misalignment. Told you it’s always the tools fault. Can’t find good help these days. Mr perfectionist here forgot to reset the distance for the cutter so I had 2 beautifully cut 1/2 thickness mortises on one side of my apron piece. Thankfully it was a long side and not the one with the holes drilled in it for the spindles. I’m sure some very colorful mumbles would have been heard if it were. I had a cutoff from making the original piece that was long enough to take the place of the Mr-Perfectionist-causality that now lay in ruin on the bench. I reset the domino cutter and proceeded to make the correctly placed mortises on the new apron.
I spent a few hours earlier in the day canvasing my shop, like a forensic team finding evidence, looking for a bag of figure 8 table top fasteners I knew I had somewhere. After a couple hours of searching the places they could have been multiple times and standing staring at my peg board where they were supposed to be, I mumbled a few choice phrases, cut my losses and went about deciding how I was going to attach the top to the aprons. I’ve seen other woodworkers use small blocks inserted into mortises in the tops of the aprons before (Figure 5).  Figure 7I have used this technique before on the second magicians table I made and decided in lieu of the AWOL 8’s I would use this as my fastening mechanism. I revisited the domino machine and cut 2 mortises close to the upper edges of all the aprons to facilitate the blocks. This time cognizant of the distance from the edge that the machine was set. Don’t have anymore wood to reconcile miss-cuts by these amateur tools.
I have found in the projects I do that sanding “up through the grits” is a mostly unnecessary step. I’m sure I will be bombarded with a lot of negative reactions for this statement. I personally only sand to 120 grit or maybe 150 grit. Anything above that is a waste of man hours and my time. I use finishes that build up a film on the surface of the wood. Usually after the first coat the wood is sealed and doesn’t soak up any more finish. The coats that follow reside on top of the first, or mixed in with it in the case of finishes like shellac. I will sand with 400 grit or 0000 steel wool between the next to and last coats in order to smooth the rough finish out so that the last application dries smooth. Beyond removing scratches, dents and mill marks I sand no further once I have a smooth flat surface. Once all the parts are cut and ready for glue I sand them to remove all the imperfections, dents and dings from the build process.
Now that all the mortises were cut I can start gluing things together. I did the glue up in two stages. I did the most mumble inducing part first, the sides with the spindles (Figure 6). Getting all the spindles lined up, before the glue set, and all the domino’s in their respective mortises careful not to dislodge a spindle was, mumble mumble, an interesting endeavor to say the least. After a bit of coaxing the sides were glued up and, to my delightful surprise, square. I’m not sure if I should have but I glued the spindles into their sockets also. I’m not sure if leaving them floating would have been best or not.
This table was really starting to look like a big boy project at this point. I didn’t have just a bunch of cut wood on the bench anymore, I had two assemblies. I stood back and admired my handiwork. I guess it’s as good a time as any to come back from my awe induced state to make the blocks to attach the top now.
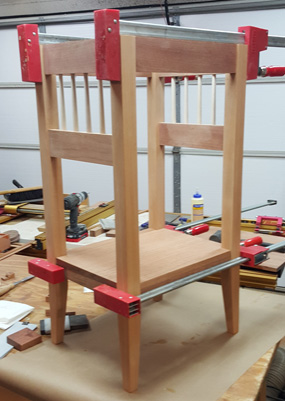 Figure 8
Figuring that the “Mr-Perfectionist-causality”, mentioned earlier, would work as well as any for the blocks and I’d be able to redeem myself for the one colossal catastrophe of this project I decided to reuse the apron I miss-cut earlier. I Looked everywhere for this broken down bit of a board and I finally found him in a particularly smokey bar on the other side of the tracks singing depressing ballads and drowning his sorrows in a pint of pine pitch. I convinced him of his worth and that I desperately needed his services and coaxed him back to my shop with uplifting stories of how useful he still could be. You can see in Figure 5 on the middle block a small “stair step” cut near the top. That’s the remnants of Mr Perfectionist’s miss-aligned mortise. I measured and cut the shape for the blocks on the table saw and drilled out counter sunk holes for screws to fit into. Nothing terribly difficult about it.
Once the glue dries from the first revolution of glue-ups I dry fit the remaining aprons and shelf supports to get the locations and final sizes of the notches that have to be cut out of the shelf. An easy enough task. I think I may have cut them to fit too well in retrospect though (Figure 7). I’m wondering how they are going to react to wood movement. I’m hoping the shelf doesn’t force the mortises and tenons apart in the changing humidity. Only time will tell that story. As you can see in Figure 6 I drilled and countersunk hole in the shelf supports for screws. I made sure the screw holes were a bit oversized to allow for wood movement. I clamped the table legs across the width and screwed the shelf in place. Figure 9
With all the parts fitted I can finally do the second phase of glue ups. This one is exponentially easier than the first. Here I just insert the remaining aprons and shelf supports with the shelf on top and clamp it up (Figure 8). Last part of the construction is attach the top. Before I attach the top though I drill out and glue in my signature medallion (Figure 9). These I also make on my laser with my logo and signature. They are 1 1/2″ in diameter which makes them very easy to install. Just drill out an 1/8″ hole with a 1.5 inch forstner bit and glue them in place. I like this better than a branding iron. It’s a bit more personal and I can customize the medallions to suit the project if I want to.
Last thing to do with this table is, once the glue is dried, is apply a finish. I first applied a 1# cut shellac to all the surfaces to seal the pores. I mixed up a 2# cut after that, waited a few minutes for the first coat to dry and applied the second coat. I applied 3 coats of shellac to the table with a light sanding with 400 grit to smooth out the surface between the last two coats. The shellac gives the Mahogany and Jatoba a very warm look and feel. Shellac is one of my favorite finishes. It adds a beautiful warmth to the wood and dries very quickly. I hate waiting days between coats of finish, as with oil based ones. Polyurathane and shellac dry very quickly. From the time I took this table out of the clamps until I applied the 3rd and last coat of shellac was less than 2 hours.
I really enjoyed this project. It took me less than 8 days from start to finish. Despite the minor bumps along the way it turned out awesome. I am extremely happy with how everything came together. It’s not the cradle for my grandson but it’s at least a very functional and useful piece of furniture.
Additional Design Considerations For Your Table
- Profile the edge of the top
- Leave off the lower shelf
- Add a drawer
- Add another shelf
- Cut curves in the front apron to lighten the look of the top
- An inlay banding on the top would add an elegant feel to the table
- Splayed legs for a wider footprint
- Enclose the lower part of the table with doors

Bamboo Fly Rods


You must log in to post a comment.